- Reasons You Will Love My Mini Cheesecake Bites
- How to Make Mini Cheesecakes
- Ingredients You Need & Why
- How to Store Mini Cheesecakes
- Cheesecake Toppings
- Common Questions
- Quick Recap—Just Make These Already
Mini Cheesecake Bites are my absolute go-to for, well, every gathering. Listen, I know the hassle of watching a big ol’ cheesecake collapse or—ugh—crack on top. Folks want that creamy middle with a perfect bite, but not the drama. So if you want to dazzle at the next get-together or have treats ready for your own midnight snack stash, trust me, you’re in the right spot. I’ll give you super easy steps, tips for keeping ‘em fresh, plus all my favorite twists because, I mean, sometimes you just crave something a tad different.

Reasons You Will Love My Mini Cheesecake Bites
Okay, let’s just say it out loud—mini cheesecake bites are a crowd-pleaser that never flops. They’re adorable, sure, but also shockingly easy. No water baths or fancy pans. You can bake a tray (or two!) with stuff you have on hand. And the best part? Absolves you from the pain of slicing a perfect wedge. That’s huge in my book.
My friends legit ask for these at every BBQ. I once brought a double batch to a birthday and they flew off the tray faster than cake. You can top them with anything you want. Got a picky eater? No problem! These even pass the kid test—my niece called them “cheese-cupcakes.” Made my whole week.
Honestly, if you need a dessert that looks like a five-star restaurant treat but takes less effort than boxed brownies, these mini cheesecake bites will not let you down.

How to Make Mini Cheesecakes
First thing? Set your oven kinda hot—think 325 degrees. Get out that trusty muffin tin. You’ll wanna line it with paper cups. Next, crush some graham crackers. Mix ‘em with a spoon of melted butter and a sprinkle of sugar for your crust. Trust me, don’t skip the butter. That’s what makes ‘em crisp, not weirdly soggy. Press a bit into each cup. This part gets a tiny bit messy if the kids are helping, just roll with it.
Now beat cream cheese (softened is best), toss in a little sugar, splash of vanilla, and an egg—maybe two if you’re doubling up. Don’t overmix. You just want smooth. Spoon this over your crusts and bake ‘til they look puffy and set. Sometimes I get nervous about timing but honestly, if the middles jiggle ever-so-slightly, they’ll set as they cool. Want them extra creamy? Let them chill in the fridge at least two hours. Or overnight if you… somehow have patience. I do not.
For a full video walkthrough, I posted one to my YouTube channel if you want to see me break a few eggshells on camera. (Nobody edits out the awkward bits, FYI).

Ingredients You Need & Why
Let’s make it super clear—here’s what you actually need, and why it matters. I’ve wasted cash on extras that didn’t make a difference, don’t do that. Stick to the basics:
- Graham crackers and butter: That’s your crust. Butter binds it. The crackers are classic but I’ve used cookies in a pinch.
- Cream cheese: Seriously, use full-fat if you want the proper texture. Low-fat kinds get oddly pasty.
- Sugar: You need a bit in both the crust and the filling. Taste as you go, but don’t skimp—bland cheesecake is just sad.
- Egg and vanilla: The egg sets everything, and the vanilla just gives it that sweet bakery smell. Skip the vanilla if you want, but it’s not the same.
I sometimes toss in a spoon of sour cream if it’s in the fridge, especially if the cream cheese is on the thick side. These are forgiving, so mess around and see what you like best.
“I never baked anything before, but your mini cheesecake bites worked—and everyone thought I bought them from a bakery!” —Samantha, Tulsa
How to Store Mini Cheesecakes
If you’ve got leftovers (I rarely do, let’s be honest), you can keep these in the fridge for up to five days. Just pack them in an airtight container so they don’t taste like last night’s pizza. They freeze well, too. Pop ‘em on a tray to freeze, then throw them in a zip bag. When you want one, let it thaw in the fridge or even the counter for a bit.
Oh, and don’t stack them if you want them to stay pretty. I learned that the hard way. Pressed cheesecake is not cute, trust me.
Cheesecake Toppings
This is where things get interesting—these lil’ cheesecakes are blank canvases. Want simple? Spoon strawberry jam or lemon curd on top. Feeling extra? Swirl in chocolate ganache, sprinkle with crushed Oreos, or slap on some blueberry pie filling. Sometimes I just add a flick of sea salt and a squiggle of caramel.
Here are a few super-easy crowd-favorite ideas:
• Fresh berries & a sprig of mint (because fancy matters sometimes)
• Dollop of whipped cream with rainbow sprinkles
• A spoonful of nutella (seriously, try it)
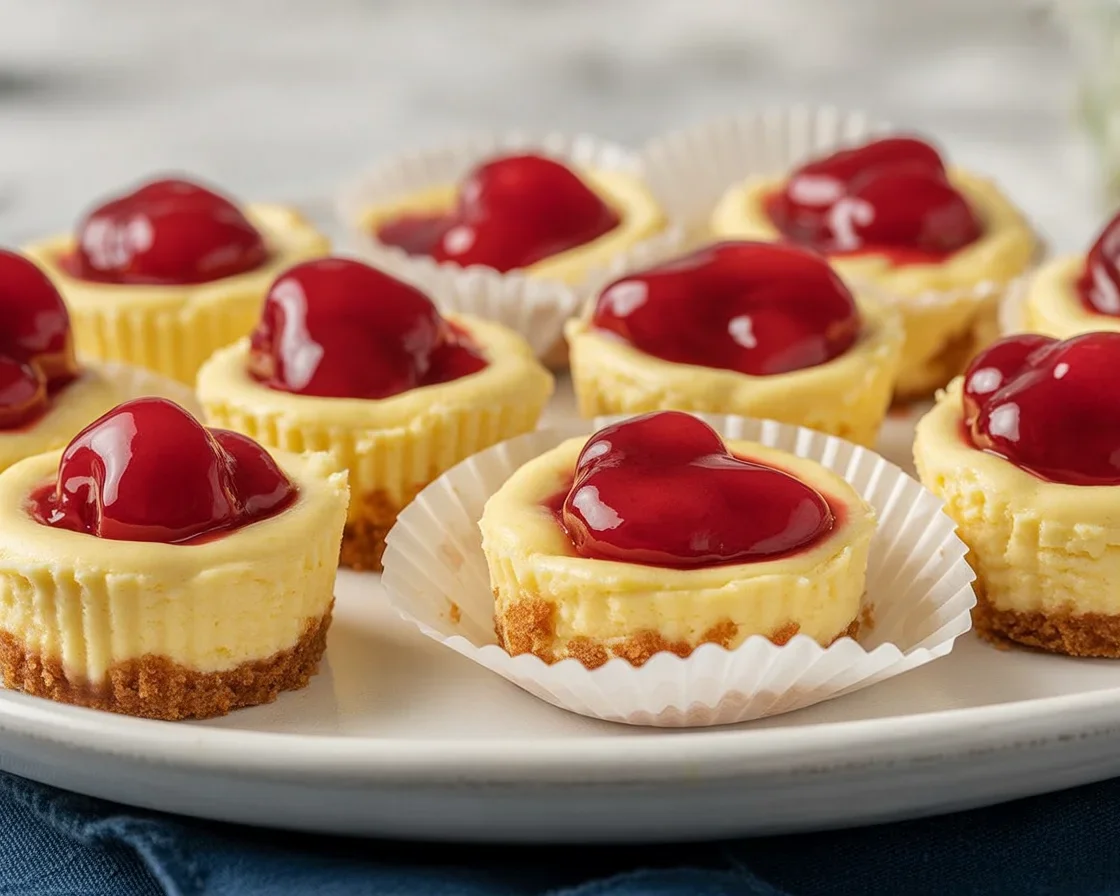
• Classic cherry pie filling from a can
Mix and match. If you want to serve a bunch of flavor options, just top some differently. You’ll look like you tried way harder than you did.
Common Questions
Do I have to use muffin papers?
Honestly? They make clean-up way easier. If you skip them, grease the tin a lot and use a butter knife to pop ‘em out.
Can I make them gluten-free?
Yes! Just use gluten-free cookies for the crust. Rice crackers work, too, believe it or not.
Why did my mini cheesecakes sink?
Probably over-mixed or baked a bit too long. It happens. They’ll still taste great.
Can I freeze mini cheesecakes with toppings?
Yep-most toppings freeze fine except fresh fruit. I add it after thawing.
Can I use flavored cream cheese?
Go ahead, but stick with classic flavors like strawberry. Garlic-chive cheesecake is not my jam (tried it once, was not a hit).
Quick Recap—Just Make These Already
So here’s the scoop. Mini cheesecake bites will wow your family with barely any effort. They freeze like a dream, leave room for creative toppings, and always look party-ready. If you ever doubted your dessert skills, these’ll have folks asking which bakery you secretly work at. Grab the simple stuff—cream cheese, crackers, and eggs—and just go for it. For more wild dessert ideas, check out all my baking tips here. You’ve got this.


Mini Cheesecake Bites
Ingredients
Method
- Preheat your oven to 325°F (165°C) and line a muffin tin with paper cups.
- In a mixing bowl, combine crushed graham crackers, melted butter, and sugar to form the crust mixture.
- Press the crust mixture into the bottom of each paper cup in the muffin tin.
- In another bowl, beat the softened cream cheese until smooth.
- Add sugar, vanilla extract, and the egg (or two for a double batch), and mix until just combined—avoid overmixing.
- Spoon the cream cheese mixture over the crusts in the muffin tin.
- Bake in the preheated oven for about 20-25 minutes, or until the centers are puffy but still slightly jiggly.
- Remove from the oven and let cool at room temperature, then refrigerate for at least 2 hours before serving.